I am often asked about streaming, downloading and file
conversion. I always try to encourage
students to download their videos since streaming takes up a lot of bandwidth
and slows down the network. However, it
seems downloading a video is never a simple task. Even if a file is downloaded there is often the
issue of file conversion. This morning a
student came to me wanting to embed a You Tube clip into her PowerPoint. It was a tedious process but this is how we
did it. I downloaded the file with Real
Player Downloader. On my PC in the upper
right hand corner, as a video plays, I am prompted to download the video. On the
MacBook Pros download player does not show up as it does on a PC. To find and launch the player go to
applications -> Real Player downloader and launch the program. Once you play the You Tube clip the movie is
listed in the download player and you select download to start the process. Once
downloaded it saves as a FLV file that needs to be converted to an MP4 to play
on a macbook pro with quicktime. I used a nifty free online file conversion site, Zamar, which worked masterfully. Once downloaded as an MP4 she was able to
embed the video. Zamar is a great free
program but sometimes it is not able to download the file, if this should
happen I usually resort to the website keepvid which is another way to approach
the conversion.
Monday, April 29, 2013
Friday, April 26, 2013
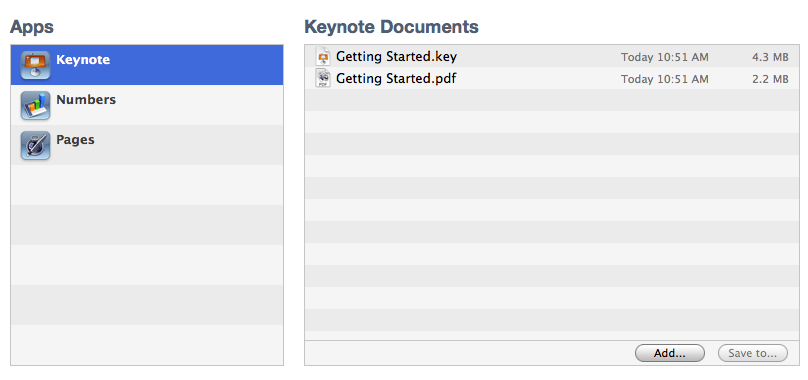
How to Copy Files from your iPad to your MacBook Pro using File Sharing
- Connect your iPad to your computer using a USB cable.
- Launch iTunes 9.1 or later on your computer.
- Select your iPad device from the Devices section of iTunes.
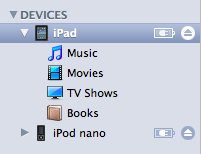
- Click the Apps tab and scroll down to the bottom of the page.
Note: If you do not see the File Sharing section shown in the image below, your iPad device does not have any apps that support File Sharing.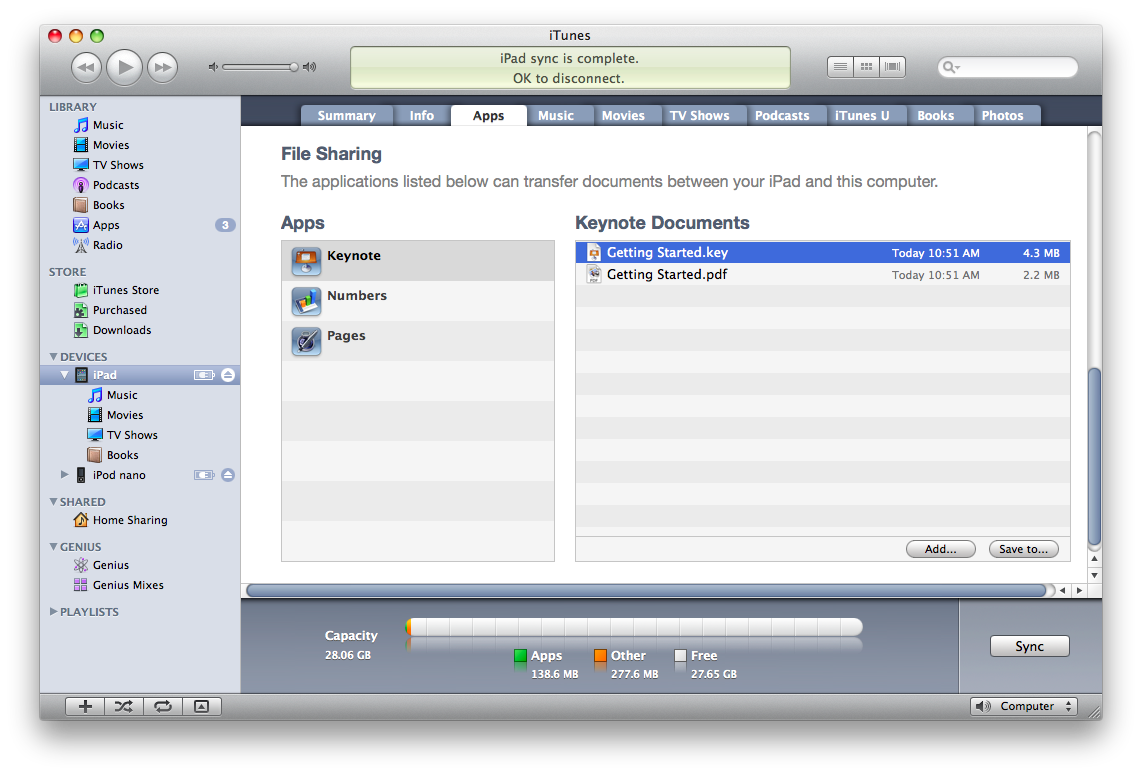
- Under the File Sharing section, you'll find a list of apps currently installed on your iPad device that support File Sharing. Select an app to view a list of the files associated with that app on your iPad.
Thursday, April 25, 2013
KET Multimedia Professional Development Days
Come explore at the annual KET Multimedia Professional Development
Days this July 9 and 10.
Space is limited so register soon. The cost of registration for the event is $50.00
per person, per day, which includes refreshments and a choice of lunch. I anticipate the cost will be covered by the school, let Dawn know if you are interested.
Participants can register for one OR both days.
Workshops for 2013:
http://www.ket.org/education/video-mm-event-infopage.htm
Basic Camcorder Video Production
Larry Moore, KET
Microsoft Office 365 and Lync Web Conferencing
for Kentucky Schools*
Patti Oakley, KATE/Murray State University; Marty Park, KDE
Digital Reenactments: Student Greenscreen Video Projects
Stephen Swan, University of Louisville
All-In-One Video Studio Boxes*
Tim Withers, Wayne County Schools; Michelle Rauch, Fayette County Schools
iBooks Author: Amazing Apple PC Project Software*
Jennifer Gordon, Corbin Middle School
Project Resources for Technology Standards by Grade Level*
Cami Knapp, KATE/Murray State University
Google Apps and Tools for Educators*
Donnie Piercey, Woodford County Schools
iPad Video Production: Take One*
Jessica Murrell, Pendleton County Schools
Tour of KET's Multimedia Production Facility
Deborah Harris and staff of KET
Using PBWorks' PB Wikis to Teach Arts and More*
Paula Mullins, Jefferson County Schools
Introduction to Using Twitter in Education
Amy Grant, KET
Digital Driver's License Project: Prepare Students to Be
Responsible Netizens*
Marty Park, KDE
Free Tools for Blended Learning: Edmodo and More*
Helen Morrison, KET
Using iPads, iPhone, iPods, and Apps for Video Production*
Jeff Gray, KET
Re-Tool Your School: Useful Online Resources*
Susan White, Corbin Primary School
Media Arts: Creating a Classroom that Fosters Creativity*
Todd Norton, Scott County Schools
How to Remove an app from your iPad
How to remove the application from your iPad
- Touch and hold any application icon on the Home Screen until the icons start to wiggle.
- Tap the "x" in the corner of the application you want to delete.
- Tap Delete to remove the application and all of its data from your device.
- Press the Home button.
Wednesday, April 24, 2013
Mac OS X: How to quit an unresponsive application using Force Quit
When your application is no longer responding and there is nothing you can do, try a force quite.
Follow these steps to force an application on your MacBook Pro to close:
Follow these steps to force an application on your MacBook Pro to close:
- Choose Force Quit from the Apple menu (or press Command-Option-Esc)
- Choose the unresponsive application in the Force Quit window
- Click Force Quit
How To Force Quit on an iPad
Follow these steps to force an app to close:
- From the Home screen, click the Home button twice.
- Tap and hold on the app.
- When it starts to jiggle, tap the
 to close it.
 - Double-click the Home button and try opening the app again.
Tuesday, April 23, 2013
Evernote storage space versus upload allotment

I have started to use Evernote for everything. I can't image how I was able to feel organized before discovering Evernote. Evernote is a wonderful note taking application that allows you to take notes, clip webpages, back up to the cloud, it is my go to application for most of what I do. I have it installed on the school image and gave a mini session to the freshman for the last two years. I was a bit of a reluctant user at first since I thought it tried to do too much. I have changed my mind. I rely on Evernote and feel it is a wonderful productivity tool that really helps me stay organized. I will definitely schedule a Tech Tuesday session on it in the Fall. If you are interested come see me and we can schedule a mini session to get you started! One great feature is that it is cloud based and I can pick it up on any of my devices. As I mentioned in a post last month it allows for a monthly allotment of 60MB of cloud storage. Or so I thought. I have only 5% storage left this month and deleted some files to free up space and was surprised to see my allotment stayed the same. Why didn't the 5% increase to at least 6%? Simply put I was confusing storage with upload. My free account lets me have 60MB of synchronized upload allowance not storage space. So once I have synced 60 Megabytes I have reached my allowance and must wait till next month to get a new allotment. I hope this clarifies things for those of you who, like me, didn't quite realize the nuances between storage space and monthly upload.
Thursday, April 18, 2013
The Fusion of Computer Science and Art
Engineering and
computer scientists at Massachusetts Institute of Technology, Martin and Erik Demaine, will display their art at the UK Art Museum from April 21 - May 26th. Adam Suhl's mother describes their work as a wonderful mixture of math, origami and magic!


Wednesday, April 17, 2013
iPad Quick Reference Card
There are a few iPads circulating in the Upper School. Here is a quick 2 page reference guide from Custom Guide that I found on Teachbytes that you might find helpful. Stop by my office if you are interested in checking out an ipad.


Monday, April 15, 2013
Google+ a powerful tool

If you are looking to increase your PLN you may be
interested in Google+. Google+ is a great way to share and
collaborate with other educators. If you
already have a Google account setting up Google+ is seamless.
One really powerful tool of Google+ is hangouts. Today U.S.
Department of State announced a new series of discussions called “Hangouts at
State.” Each month there will be
conversations about pressing US policy issues.
The series kicks off on Friday, April 19 with a Hangout with U.S. Secretary
of State John Kerry, entitled “The U.S. in the World: What’s In It for Us” and
moderated by NBC’s Chief Foreign Affairs Correspondent Andrea Mitchell.
Friday at 1 p.m. E.T the conversation will unfold. For news about the next “Hangout at State” visit Google Politics and Elections page .
Friday at 1 p.m. E.T the conversation will unfold. For news about the next “Hangout at State” visit Google Politics and Elections page .
Wednesday, April 10, 2013
Duplex Printing with your MacBook Pro
Choosing
the duplex print option for your printer
Go
to the Apple menu -> System Preferences
->Print & Fax -> select your printer and choose options and supplies ->
->Print & Fax -> select your printer and choose options and supplies ->

Select
the Driver tab and make sure you have
a check box next to the duplex function

Directions
for Printing Double-sided on your MacBook Pro
In the Upper School, duplexors include Floor0 printers, Floor1, Floor2-1, Floor2-2
In the Upper School, duplexors include Floor0 printers, Floor1, Floor2-1, Floor2-2

Then in Two-Sided, choose
Long or Short-edge binding. Long-edge is more frequently used, but if you want
a horizontal document (like a flip calendar), choose short.

SMART Recorder settings for video and audio on your MacBook Pro
If you are using your SMART recorder to record some of your lessons you can minimally control the quality of the recording through the menu button. I tested the high quality sound verses the low quality sound and there was an enormous difference. So if you are wanting a simple sound/video recording with a little better quality but you are not interested in using another application try modifying the settings as show below.
Changing
a SMART recorder settings for Video and Audio Quality on your MacBook Pro
Go to Spotlight in the upper right hand corner of your MacBook
Type in Smart tools > choose Smart Tools
Double click on the recorder
- Select Menu > Options in SMART Recorder.
A dialog box appears.
- Press the Recording Quality tab.
- Select a sound quality in the Sound Quality list.
NOTE: Although higher
sound quality produces better audio playback, it also increases the file size.
- Select a video quality in the Video Quality list.
OR
Select Custom, and then type the
required frame rate.
NOTE: Although a higher
frame rate produces higher quality recordings, it also increases the file size.
TIP: If you select Automatic
Selection (Recommended), SMART Recorder automatically evaluates your computer
and selects the optimal frame rate.
- Press OK.
Subscribe to:
Posts (Atom)